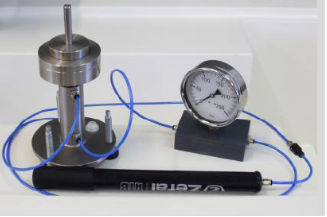
Calibration of a Pressure Gauge


Description:

Learning objectives/experiments:

  • To Function, operation and calibration of a Bourdon tube pressure gauge.


Features:

  • Many engineering applications use the Bourdon gauge.
  • This equipment Calibration of a Pressure Gauge experiment allows students to study Bourdon Tube theory.
  • They see the working mechanism, calibrate the gauge and compare theoretical results to experiment results.
  • The apparatus is a Bourdon gauge connected to a dead weight tester.
  • The Bourdon gauge has a transparent dial that allows students to see the working mechanism.
  • The mechanism is a thin-walled tube with an oval cross-section, bent into an arc. One end of the tube is held rigidly.
  • This end admits pressure. The other end of the tube, connected to a dial and pointer mechanism, is free to move.
  • When the pressure in the tube increases, it tries to straighten and so moves the pointer by an amount proportional to the pressure increase.
  • To calibrate the gauge, students add weights to a platform on a dead weight tester.
  • The weights put a known force on to a piston.
  • The piston has a known area, so students can calculate the pressure.
  • A flexible tube containing water transfers the pressure on the piston to the Bourdon tube.
  • Students add the weights in increments, recording pressure readings from the gauge at each increment.
  • They then remove the weights and record gauge readings.
  • By working out theoretical results they can work out gauge error and discuss possible causes.
  • Shows ‘dead weight’ calibration of a Bourdon gauge.
  • Bourdon gauge has transparent dial so students can see how it works. 
  • Suitable for group demonstrations and student experiments.
  • Simple to operate.
  • Compact, bench-mounting unit.
  • Self-contained – needs no extra services


Specification/ Technical data:

  • Net dimensions: Approx.: 470 mm x 420 mm x 270 mm
  • Packed dimensions: 0.11 m3 and 10 kg
  • Weights: Four 1 kg weights, two 0.5 kg weights, one 0.2 kg weight
  • Bourdon gauge scale: Graduated in 0 to 200 kN.m–2 in 10 kN.m–2 intervals.
  • Bourdon tube arc: Approximately 270º
  • Maximum dead weight tester load:5.2 kg
  • Typical gauge error:1 kN.m–2 over the entire range
  • Operating environment: Laboratory Storage temperature range: –25°C to +55°C (when packed for transport)
  • Operating temperature range: +5°C to +40°C Operating relative humidity range: 80% at temperatures < 31°C decreasing linearly to 50% at 40°C
  • Bench space needed: Approx. 400 mm x 500 mm


Send us Enquiry


Visit Us

Office: S. N. 37/02, "Ashtavinayak Indl. Estate", Parvati Nagar, Dhayari Narhe Road, Next to Pari Robotics, Narhe, Pune-411041
Tel fax: (020) 24690312,
Email: sales@xeepl.com, xeepl.pune@gmail.com

Lets Visit

Become a Facebook Fan